For QA in an agile development team, SPEED is everything. It is a game on a high-speed roundabout, developers introduce new features and fixes every day, and you better test everything before the next iteration. Besides the new features or fixes, you still need to handle a full UI regression smoke test, how is that possible? Hire more staff? Test automation is a way out for smart teams, and that’s what we do at Oursky.
Preparation
The basic aim of Test Automation is to replace repetitive human work with computers.
So, to get started, all you need to do is no more than wrapping up your existing test plans, and to decide which parts are to be automated. If you already have a comprehensive test plan, with step-by-step test cases and well-defined expected results, congratulations! You are perfectly ready for automation.
Or else, some preparation are needed.
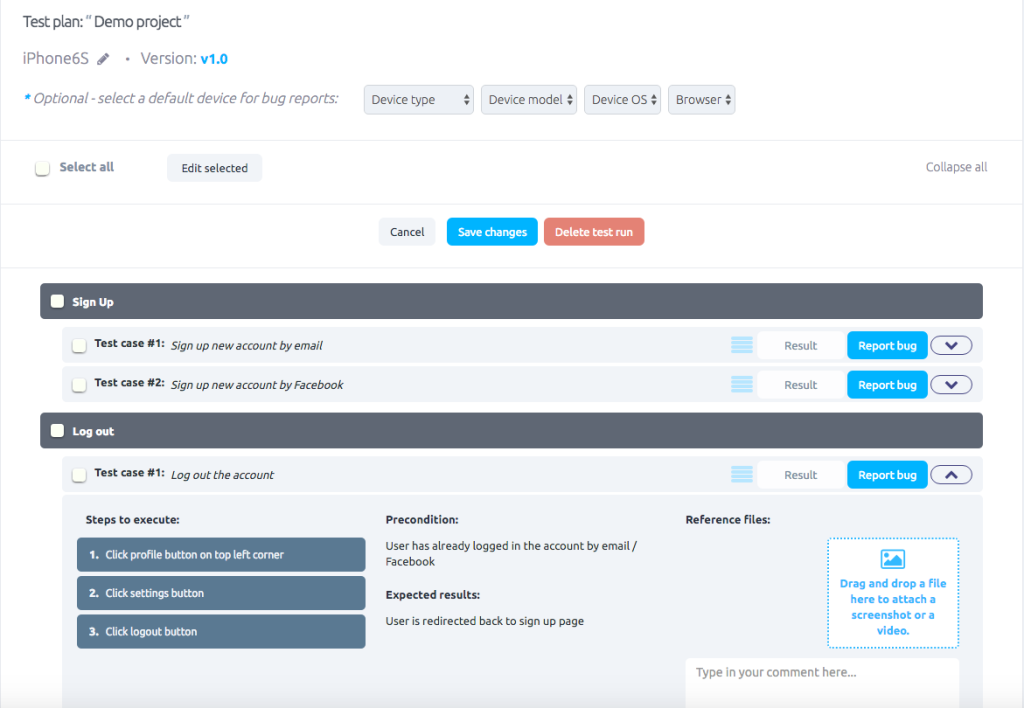
What is a Test Plan?
Your automation-friendly test plans should include the followings:
- Testing environment
- Testing platform, OS version, browser version, etc.
- Test Suites – wrapping test cases into groups
- Step-by-step test cases, as detailed as possible, e.g:
- Click Login button
- Enter username: abc
- Enter password: 123456
- Click Done button
- Expected results, the checkpoints for each test case, e.g.
- The word “Success” shown on screen
- See profile picture appeared at the top-left corner

Later you will take this test plan as a reference for your automation script. No need to worry about the format for now, just make it clear enough so that you could avoid test run failing due to missing steps.
If you have no idea how to write a good test plan, you may try drafting on a spreadsheet first, or write with helpers online like LeanTesting and Testpad.
Choosing The Suitable Tool
Now you are ready to setup your tool. There are tons of automation tools all over the Internet, designed for testing on different platforms. For example, Selenium, Appium, Calabash, Cucumber, Ranorex, Robotium, Espresso, Frank, UI Automator, Phantom JS, QTP, Sahi, Watir…Much more than you think!
Among the sea of testing tools, you are suggested to spend some time comparing them first, as they vary in limitation and setup difficulty.
To help you choose a suitable tool — for starters, try to answer these questions, and then see if the tool support meets your requirements:
- Which scripting language would you like to use?
- Does the tool support your application platform (Web, Android or iOS)?
- Is checking on special UI elements such as push notification and Android toast message required?
- Is checking on system-level controls, say pressing device power button or home button, switching on and off Wifi signal, or changing device orientation required?
- Is checking on different types of touch actions like swipe and pinch required?
- Is image recognition required?
- Is audio recognition required?
- Can the tool generate script by recording user actions? This may speed you up a lot.
We are preparing a comprehensive comparison between different test automation tools, subscribe to our newsletter to stay up-to-date
Selenium and Appium
While different tools might be more suitable in different situation, our team default goes to these two popular test automation tools:
Both Selenium and Appium have active user communities, which meant great community support and readily available tutorials and solutions to the more generic problems. Another good thing about using these two with your stacks is that they have very similar architecture and scripting format, which you could learn the tricks once and apply them to both.
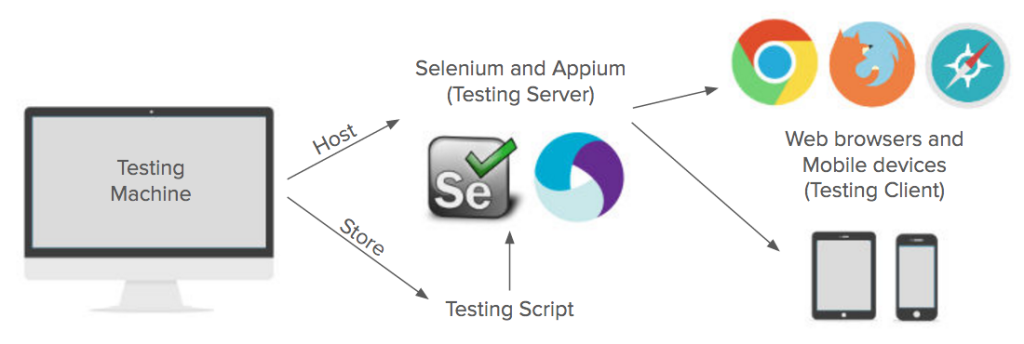
Basically, the testing work flows in Appium and Selenium are like this:

They act as a driver between the testing machine and your target.
With a testing script written, you will
- Need to host a server on your machine,
- Get the client side setup ready as well (browser installed or simulator launched).
- While running your script, the server will drive the client to perform actions according to your codes, for example
- clicking
- typing
- and verifying elements
As the test flow was based on your script, the machine could therefore automate your work like a human.
Script and Run
At this point, you might be thinking that: “But I am not a developer, how can I script?!”
Not to worry — basic understanding of programming is all it required for translating your well-written test plan / process into an automated testing script.
By changing your human-readable instructions into corresponding commands, it is straight-forward and understandable even for programming beginners.
Without further ado, let’s take a look at this example of a testing script:
# lines start with # shortly describe what the codes are doing
# these lines will be skipped by the computer when running script

# import required components for the script
import os
import unittest
from appium import webdriver

# write a test suite called DemoAppTest
class DemoAppTests(unittest.TestCase):

    # define setup
    def setUp(self):
        print('Setup test')

        # set the testing client environment
        desired_caps = {}
        desired_caps['platformName'] = 'iOS'
        desired_caps['platformVersion'] = '9.3.1'
        desired_caps['deviceName'] = 'iPhone6S'
        desired_caps['udid'] = '12345abcde67890fghijklmnopqrstuvw1234xyz'
        desired_caps['bundleId'] = 'com.testing.demoapp'

        # map the settings to testing server by Appium driver
        self.driver = webdriver.Remote('http://localhost:4723/wd/hub', desired_caps)

    # define tear down
    def tearDown(self):
        print('Tear down test')

        # stop the Appium driver
        self.driver.quit()

    # define test case 1
    def test_case_1(self):

        # find Button 1 and click it
        print('Click button 1')
        element = self.driver.find_element_by_ios_uiautomation('.buttons()["Button 1"]')
        element.click()

        # find and check the element with the text "Hello!"
        print('Check result: Hello!')
        element = self.driver.find_element_by_ios_uiautomation('.tableViews()[0].cells()[0]')
        self.assertEqual('Hello!', element.get_attribute('name'))

    # define test case 2
    def test_case_2(self):

        # find Button 2 and click it
        print('Click button 2')
        element = self.driver.find_element_by_ios_uiautomation('.buttons()["Button 2"]')
        element.click()

        # find and check the element with the text "World!"
        print('Check result: World!')
        element = self.driver.find_element_by_ios_uiautomation('.tableViews()[0].cells()[0]')
        self.assertEqual('World!', element.get_attribute('name'))

# start running the test suite
if __name__ == '__main__':

    # load all the test cases in DemoAppTest
    suite = unittest.TestLoader().loadTestsFromTestCase(DemoAppTests)

    # run the script
    unittest.TextTestRunner(verbosity=2).run(suite)
Explaining the script
This is a sample code written with Appium Python Client. It runs a test suite on an iPhone 6s, to click two buttons on screen and check for different results. The codes maybe quite different if you are using a different tool, but the structure is more or less the same.
In the example above, you can take the whole script as a test suite, and the functions inside are the fixtures (setup and tear down) and test cases to be ran. But if the above script is a bit hard for you, you could try to read through its structure first, which is actually like this:
- Import required components for the script
- Write a Test Suite called DemoAppTest
- Define Setup
- Set the Testing Client Environment
- Map the settings to Testing Server by Appium driver
- Define Tear down
- Stop the Appium driver
- Define Test Case 1
- Find Button 1 and Click it
- Find and check the element with the text “Hello!”
- Define Test Case 2
- Find Button 2 and Click it
- Find and check the element with the text “World!”
- Define Setup
- Start running the Test Suite
- Load all the Test Cases in DemoAppTest
- Run it! (It will run in the order: Setup -> Test Cases -> Tear Down)
You could easily find that the complexity of the script depends on your manual test plan a lot: how you define a test suite, testing environment, step-by-step test cases, expected results and so on. Take some time to learn the syntax from official documents, you will then be able to easily convert your words into codes!
Remember: The clearer your test plan, the faster you script.
Running the test
Finally, if you have already setup the tool and created a testing script, it’s time to run it.
If you are using Appium, host a testing server by command line:
$ appium -p 4723
Get your device or browser ready. And run your testing script:
$ python samplescript.py
After a while, you will see the test result appearing like this:
test_case_1 (__main__.DemoAppTests) ...
Click button 1
Check result: Hello!
test_case_2 (__main__.DemoAppTests) ...
Click button 2
Check result: World!
----------------------------------------------------------------------
Ran 2 tests in 10.061s
Done! Tests successfully ran by computer.
So now you can always simply call a command to run a test. How about integrate it into your workflow?
Continuous Integration
Continuous Integration (CI) is a common practice in an agile workflow, at Oursky we wish to integrate the test automation in CI, here are what we do.
Jenkins – Open-sourced test automation tool
Jenkins is an open-source option that you can fully manage and keep track with your test results. We integrate with Github which host our code:

It communicates with the automation tool and your testing script to get it running. So all you need to do is to:
- Push your testing scripts to GitHub for the Jenkins server to retrieve
- Configure the Jenkins server and install the tools it may need
- Configure the running operations for a specific test, and
- Click the Build button
You could later on write advanced scripts to make it run periodically, or run it when the project has a new commit. You can totally lean back and wait for the test results.

It would be a good enough point to end at this stage. Yet, if your team are chatbot-savy like us, here is an even better option.
Make It a Bot!
If you’re a part of a project team, you probably need to frequently report your test results to your project manager and other teammates. There are extra communication overhead, how can we automate it?
What if the test results would be automatically posted to your team’s messenger when it is finished?
What if your project manger could run the tests using the CI tools by typing one word in the team’s messenger?
We use a lot of bots at Oursky, so that’s our default solution.

If you use Jenkins and Slack like us, you can simply get the Slack plugin of Jenkins: to send notifications to your Slack channel when a test has started or finished and vice versa. You can also add a slash command to your Slack channel: to post a network request to your Jenkins site, or to trigger a test run by typing a command in the messaging app.
Once the setting is done, the whole team in your group can use it. Project managers can trigger test runs whenever they want, and everyone will get notified when a test is passed or failed. You can now just sit comfortably and have a nice cup of coffee while the computers are doing the boring heavy lifting for you.
Conclusion
The long test automation journey can actually be divided into three main stages:
- Automate a single test run
- Automate the build process
- Automate the communication with team
To automate a test run, write a good test plan, setup an automation tool and script the test plan.
To automate the build process, we setup a CI server and move everything to remote.
To automate team communication, we integrate it with messaging apps and send notifications.
At every stage, you may need to pick up new knowledge on the go, and it may be a difficult process, especially for non-tech teams. However, trust me on this – once you get through the bottleneck, you can be really FAST and ACCURATE!
Give it a try — you won’t regret it.
If you have any tips to share with us, leave a comment below!


3 comments
Very informative post and it was quite helpful to me. I also wrote something similar lines on automation in agile testing – http://bit.ly/1TQtHRG
Hi, thank you for this post I agree with you that For QA in an agile development team, SPEED is everything. It is a game on a high-speed roundabout, developers introduce new features and fixes every day, and you better test everything before the next iteration. very useful information