In WWDC2015, Apple announced iOS 9 for iPhone and watchOS 2 for iWatch. It has been a huge revamp for watchOS. Not until now, a watch app finally runs natively on the watch.
That means the code is now executing on your watch instead of the phone. By reducing multiple times of data transfer between devices, this is going to make the app loads a lot quicker and responds in a shorter period of waiting time.
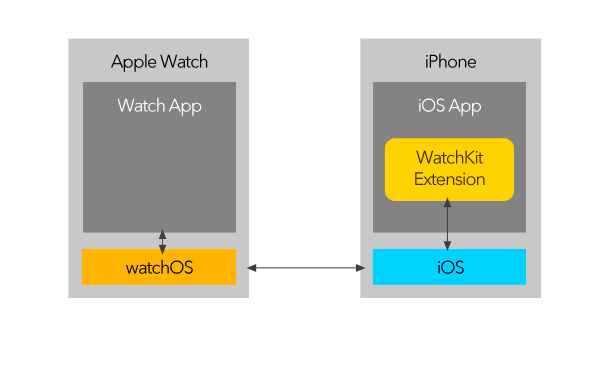
watchOS 1
WatchKit Extension runs on the phone and the Watch App is more like a display console for your app.
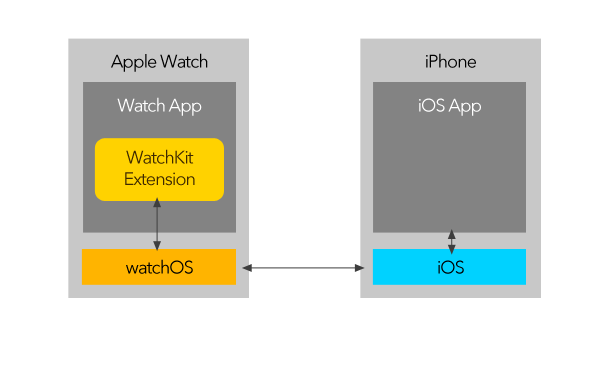
watchOS 2
WatchKit Extension now runs on the watch, you don’t have to run a watch app with the phone connected actively.
Spentable: our first app on the watch
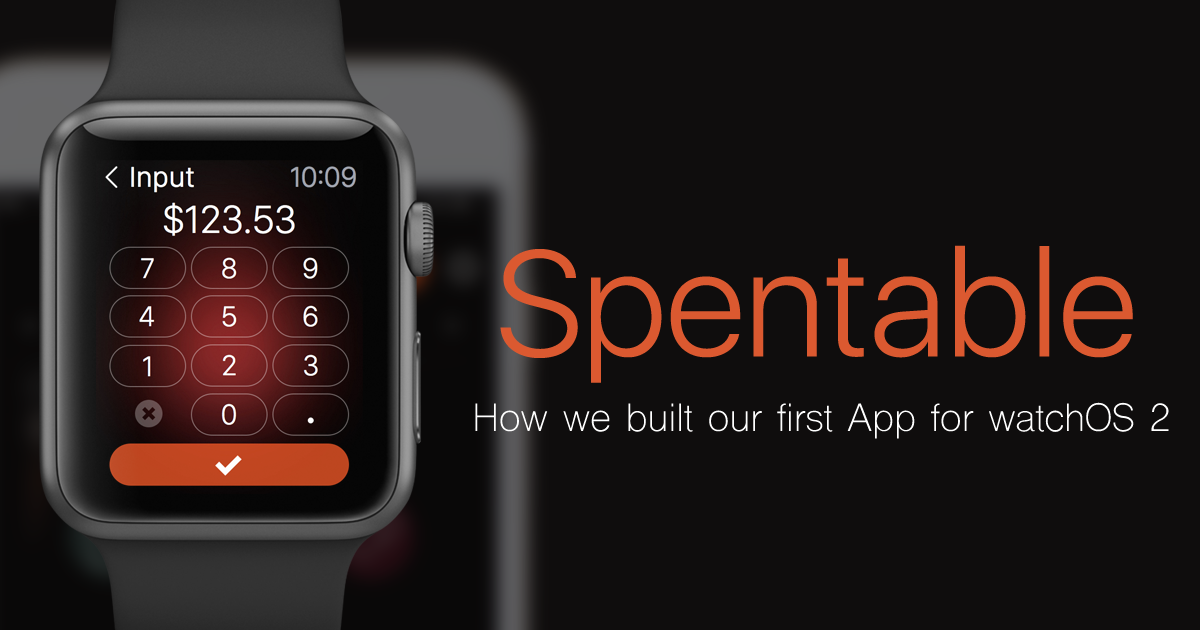
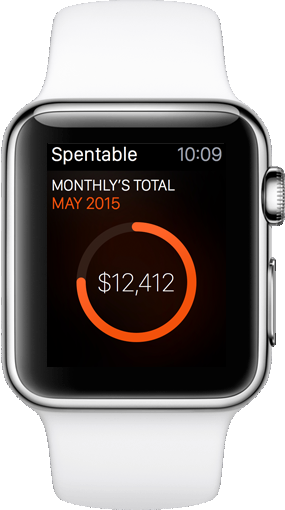 Oursky has recently built Spentable 2.0 , it’s also available on the Apple Watch.
Spentable is a handy, in-your-pocket app that helps you to track your expenses and make purchasing decisions. Now you can even track you daily expense via the watch App without taking out your phone.
In this post, we will talk about the experience on building an app for watchOS 2.
Since the watch app is now running on the watch as a native extension, there are situation we need to handle data sync between the phone and the watch. For example, we wish expense input via the watch will be reflected on the phone instantly.

Get connected to the phone: Watch Connectivity Framework
In watchOS 1, the watch app must be connected to the iPhone app (we call it the main app) to work. We often call to send a message to the iPhone app. However, now the connections in watchOS2 are handled by the Watch Connectivity Framework.
The Watch Connectivity Framework provides a seamless background connection between iPhone and iWatch. It helps doing all the synchronization work between the main app and the watch app. When the watch app handles a user input say, a new expense item, it has to notify the main app and get the record updated. The could be easily done via the Watch Connectivity Framework.
This allows Device-to-device communication more freely (such as transferring files, user infos and application context around ). There are serval APIs to transfer particular data for different use cases.
So how do we choose between them?
Update Application Context
updateApplicationContext:error: is good for a small amount of volatile data in background. Most of the cases we send state changes and view content, as the later dictionary data sent will replace the previous. In Spentable, we make use of this API to update the Monthly/ Daily total on app’s glance and complication interface.
You can call updateApplicationContext even when the watch app is currently unreachable (and even not installed). The main app can update all the preferences and states as the watch is always there. This brings a huge advantage on the User Experience : Preferences data will be received upon the Watch App is launched for the first time. Hence the app is ready to be used instantly on the watch without asking users to open the main app for initial synchronization.
Here’s what we did to update daily and monthly amount:
- (void)updateApplicationContextExpenseTotal
{
    GetMonthlyExpenseInteractor *monthlyExpenseInteractor =  init];
    GetDailyExpenseInteractor *dailyExpenseInteractor =  init];

    NSMutableDictionary *updateDict = ;

    NSMutableDictionary *monthlyAmounts = ;
    for (NSDictionary *expense in )
    {
        monthlyAmounts uuid]] = expense;
    }

    updateDict[@"watch:expense:month"] = @{ @"amounts" : monthlyAmounts,
                                            @"date" :  };

    updateDict[@"watch:expense:day"] = @{ @"amount" :,
                                          @"date" :  };

    ;
}

- (void)updateApplicationContextWithDictionary:(NSDictionary*)dictionary
{
    NSMutableDictionary *ac = ;
    for (id key in dictionary.allKeys)
    {
        ac = dictionary;
    }
    ;
    [ initWithSuiteName:kAppGroupName] setObject:ac forKey:@"applicationContext"];
    [ initWithSuiteName:kAppGroupName] synchronize];
}
Transfer UserInfo
transferUserInfo:
transferCurrentComplicationUserInfo:
As the name suggested, we can transfer UserInfo and Complication info between paired devices. It differs from updaterApplicationContext:error: with its data queued on the recipient device in order. This is critical for consistency, as in Spentable, we have to handle all the expense records in a sequential order.
Transfer File
transferFile:userInfo: does the file transferring job in background. This API is useful for displaying received images/files on the watch if you are writing a social / messenger application.
Send Message
sendMessage:replyHandler:errorHandler:
sendMessageData:replyHandler:errorHandler:
This is the only API that requires active connection with the phone. Upon calling the method, data is sent immediately to the receiving app. This might remind us of the legacy API in watch OS 1, which also requires active connection between devices.
You can also specify a reply handler to handle the response. This is great if you need a immediate response from the counter app, however if it is unreachable (not launched or in the background), the errorHandler block will be executed instead. So this is not really suitable to send data you wish to persist.
Fit you app in the tiny watch face : Layout on Watch App
Design layout on a tiny watch face can be challenging. Despite Apple has officially provided guidelines for watch app design.
Meanwhile, during development there are also points regarding the interface good to note:
Storyboard only for watch
Developers MUST use Storyboard to define layout
- Mind that there are constraints:
- Views cannot overlap each other
- Element position can only set using Vertical / horizontal alignment, you should not Hard code thier absolute position
Best to bear in mind – there are different sizes.
- There are two kind of watch size (38mm and 42mm) available from Apple. For some layouts, we have to customize for layout for both sizes, for example difference image size and margin settings.
Handle TableView for the watch
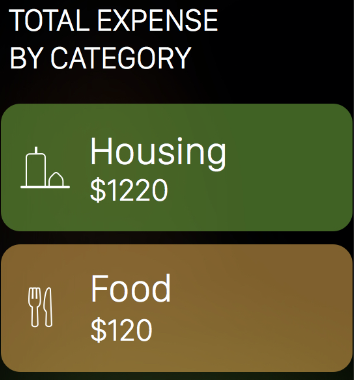
TableViews are handled differently than we often do in an iPhone app. Instead of getting an UITableViewCell from -(UITableViewCell *)tableView:(UITableView *)tableView cellForRowAtIndexPath:(NSIndexPath *)indexPath , on watchOS we make use of a MainRowType Object.
A MainRowType object is just an NSObject that holds the icon and row description itself. Then we can config each row according to the the properties in each MainRowType. For example, we have defined WatchMonthlyExpenseRowType as such:
#import <WatchKit/WatchKit.h>

@interface WatchMonthlyExpenseRowType : NSObject

@property (weak, nonatomic) IBOutlet WKInterfaceGroup *backgroundView;
@property (weak, nonatomic) IBOutlet WKInterfaceImage *imageIcon;
@property (weak, nonatomic) IBOutlet WKInterfaceLabel *labelName;
@property (weak, nonatomic) IBOutlet WKInterfaceLabel *labelAmount;

@end
Developers can build more powerful apps with the new APIs on watchOS 2. We hope this experience will help anyone there who wish to create watch apps.
Please let us know your thoughts via comment below or our Twitter.
Get Spentable. Get the love of your life.
Spentable is now available on the AppStore. Please give it a try!
Give us any valuable feedback, this would help us make Spentable better for you.
Futher Readings
About Designing Apple Watch Apps
https://developer.apple.com/videos/wwdc/2015/?id=802
Introducing WatchKit for watchOS 2
https://developer.apple.com/videos/wwdc/2015/?id=105
More about watchOS 2
https://speakerdeck.com/oursky/watchos2
Tell us what you think and subscribe to our blog if you find this helpful.
Follow us on twitter to get updated.


5 comments
Wow, thank you very much for sharing. I’m not an iOS dev but I sure learned something from this.
Thanks Tyrone! Do you have any plans to make anything for iOS?
Wow, thank you very much for sharing. I’m not an iOS dev but I sure learned something from this.
Looks amazing! It seems a lot of work went into building this app for WatchOS.
I have been looking this information for a while because I am learning iOs language and this will definitely help me in future.